How To Access Your Profit And Loss Statement

How to access your “Profit and Loss Statement

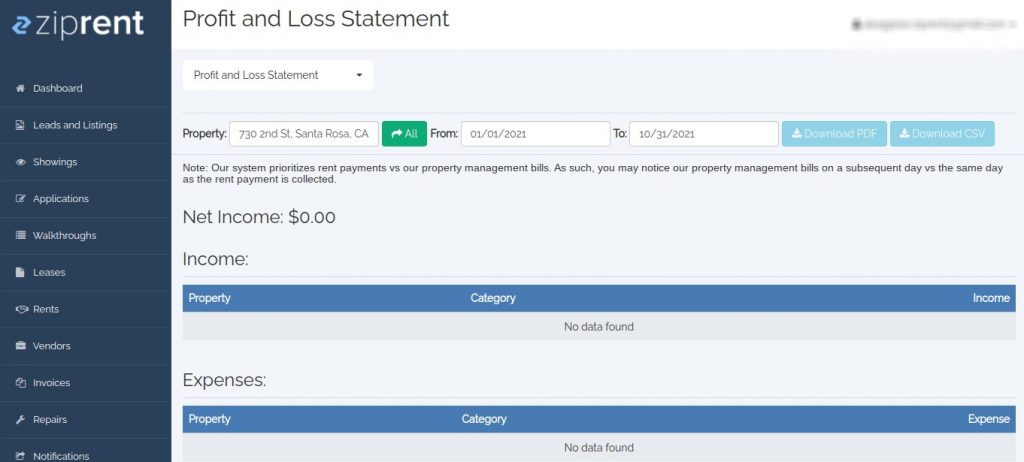
Ziprent keeps a number of reports for each of your properties to make sure some of the most valuable data is all in one place. This information will assist in your ability to make smart and informed decisions based on each individual property you own. Keeping track of both your expenses and your income will help you figure out where you can cut costs as well as ways to increase income. If you have any questions about the reports, you can contact Ziprent. If you want to access your “Profit and Loss Statement” just follow these simple steps:

Step 1:

Log into your Ziprent account.

Step 2:

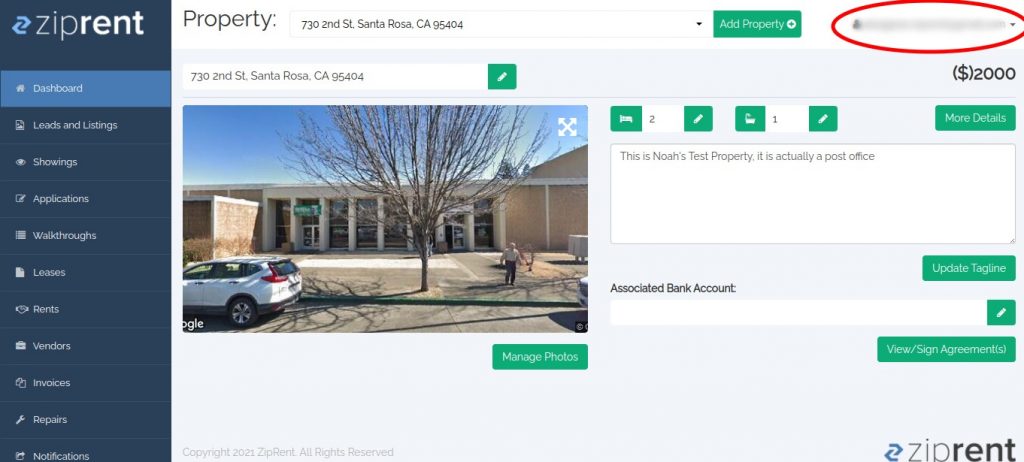
In the top right corner, you will see your username. Click on your username.

Step 3:

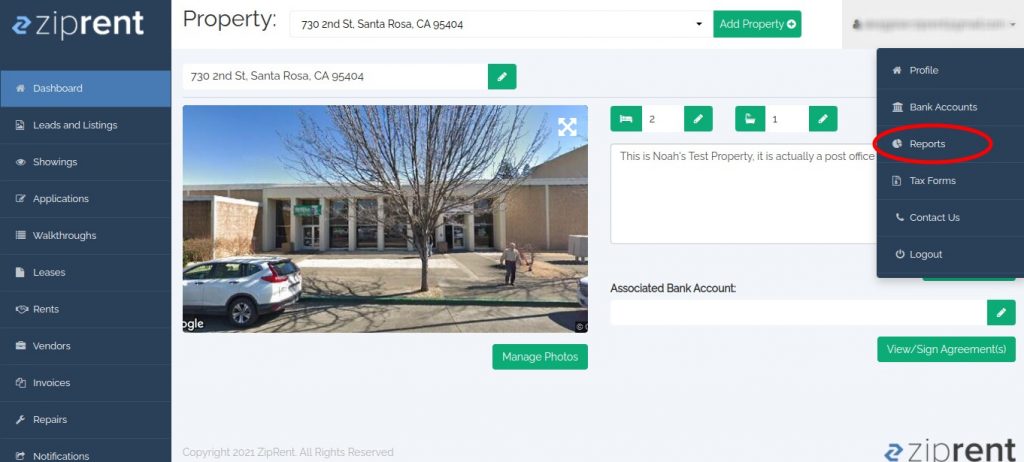
After clicking on your username, drag your mouse down and click on the “Reports” button. This will give you access to all of the reports Ziprent keeps for your properties.

Step 4: 

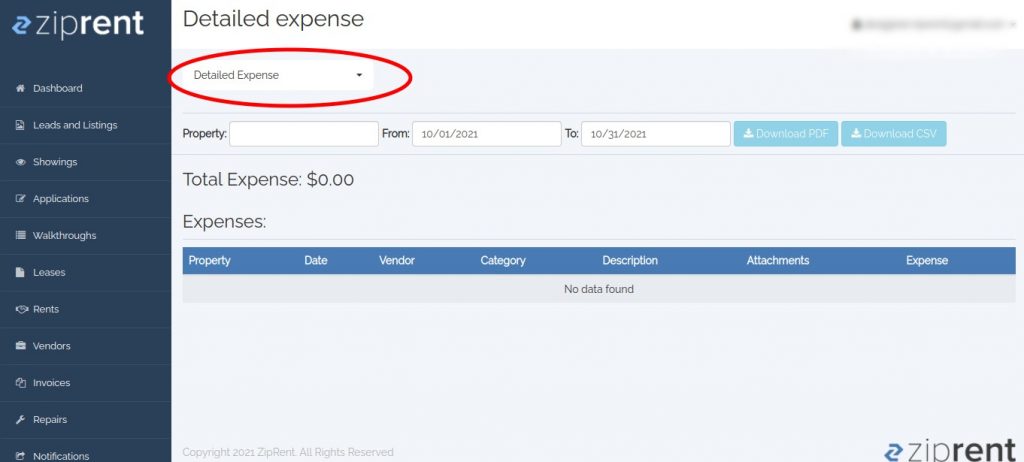
On the left side of the “Reports” page, you’ll see a dropdown box that will allow you to select any report you wish to see. Click on that dropdown box.

Step 5: 

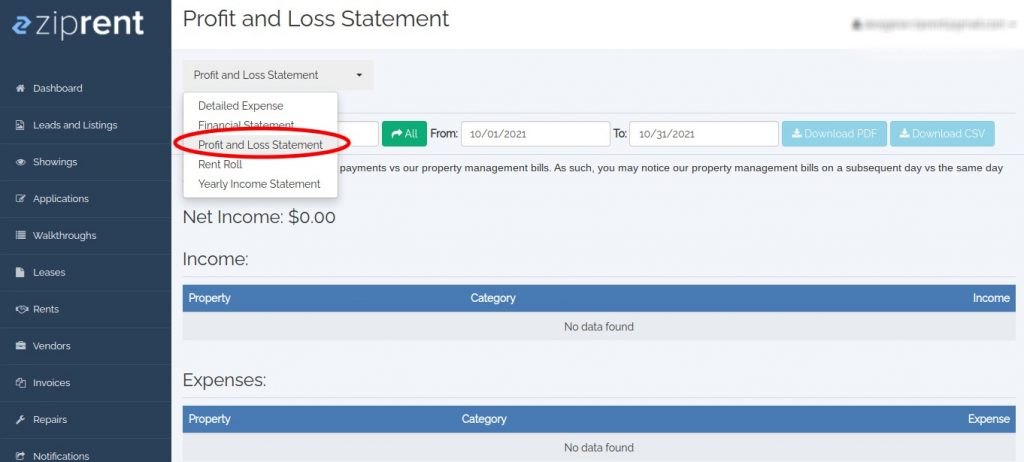
After clicking on the dropdown box, drag your mouse and select “Profit and Loss Statement”

Step 6:

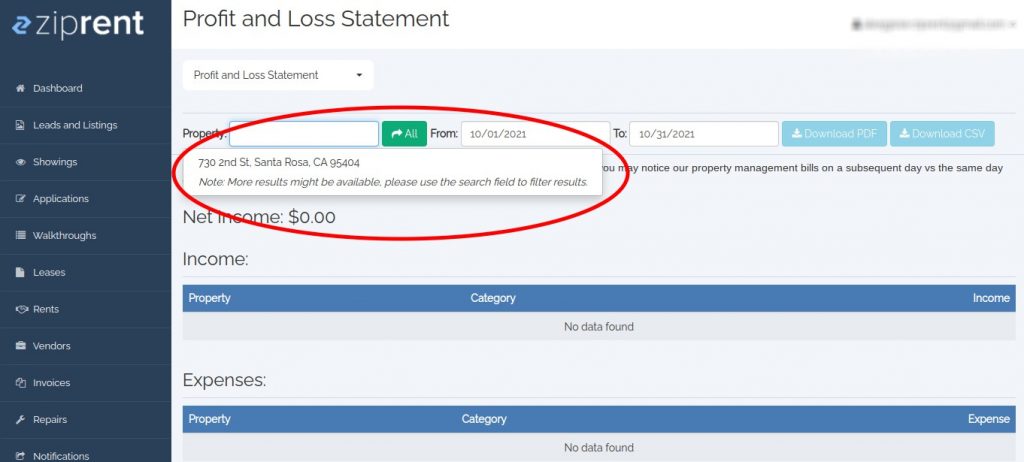
Under the dropdown box is a box where you can select which property of yours you would like to see the “Profit and Loss Statement” for. Select a property.

Step 7: 

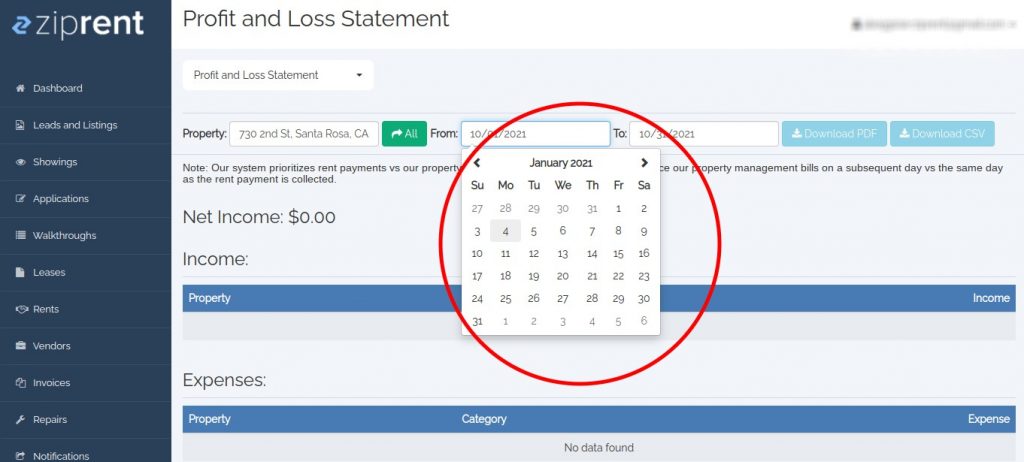
Select the dates for the time period you would like the report to show. For example, if you want to see your report from 2020, you would select 1/1/2020 to 12/31/2020.

Step 8: 

Now you have your “Profit and Loss Statement.” You will be able to see your net income as well as your total expenses for your property. You can also download your report in the form of a PDF or a CSV, whichever you prefer.

How To Refinish Kitchen Cabinets

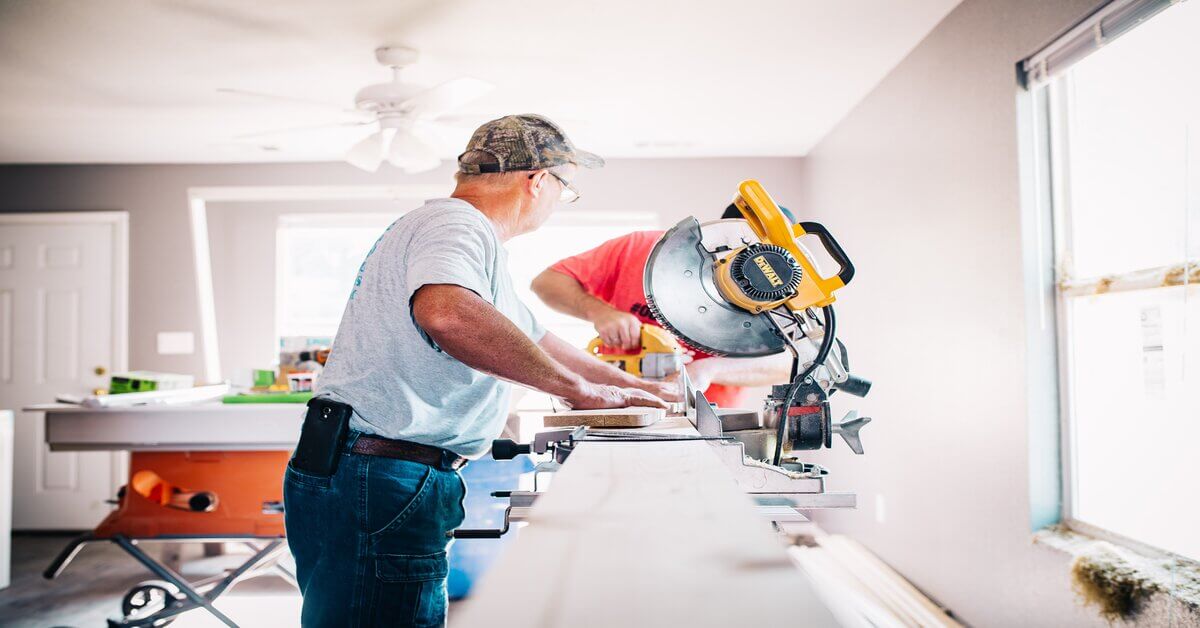
Regular maintenance and repairs, especially when preparing a unit for a new tenant can get expensive. With a high turnover of tenants or the more units owned, those costs can add up quickly. One way to keep costs down is to do some of that routine maintenance yourself. 

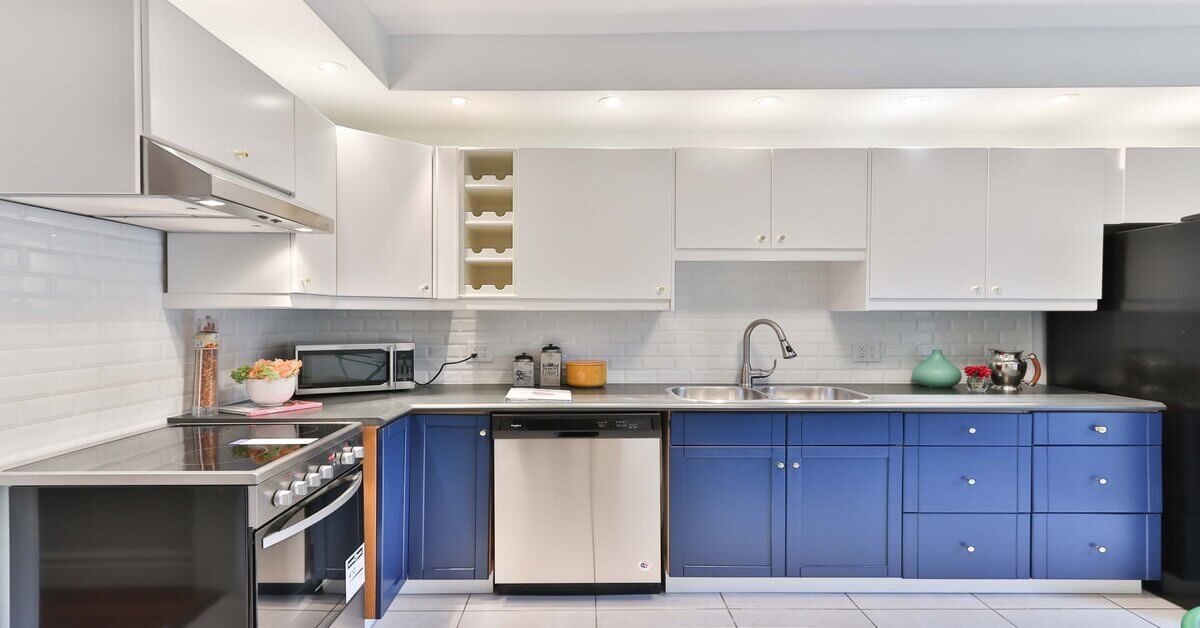
New kitchen cabinets can cost over 5,000 dollars while refinishing and painting them yourself can cost only hundreds. You could pay workers to do the job for you, but that will increase the costs just to touch them up. Painting the cabinets yourself can be done in a weekend if you know what you’re doing.

Before starting

Examine the cabinets to make sure they don’t have any structural damage. As long as they are in good condition, you won’t need to replace the cabinets. There is also a good chance the older cabinets are made with a higher quality of material than any newer reasonably priced cabinets. 

Both oil and latex paints can be used. Latex paints tend to take longer to cure but they are more user-friendly for those who aren’t experienced. If you do choose latex paint, make sure it is a 100 percent acrylic formulation.

Brush and spray paint are both options. Spray painting may require you to pick up some extra equipment depending on what you already have. It will require a space that won’t risk paint getting everywhere and will also require a mask and this could end up being more time-consuming.

Be sure to use high-quality brushes. Purchase a 3 to 4-inch wide square brush as well as an angled 2 and a half to 3-inch wide brush. Use a synthetic bristle brush for latex paint and a natural bristle brush for oil-based paint.

If the existing finish is a clear coat, it’s a good idea to strip it down to the bare wood before painting. This will eliminate a potential adhesion problem with the new paint.

Step 1: Prep the kitchen

  • Empty all the cabinets. Clear all the counters and remove all the free-standing appliances
  • Move all tables and furniture out of the room 
  • Tape rosin paper over the counter and the floor. Use plastic sheeting on the backsplash and any windows and doors. 
  • Mask off the walls around the cabinets
  • Set up a worktable for painting the drawers, doors, and shelves.

Step 2:  Remove the shelves, drawers, and doors

  • Remove the hinge screws from the cabinet and remove the doors
  • Working from left to rights and top to bottom, number each piece with tape and number where they came from with the same number. 
  • Set aside shelf hanging hardware
  • At the worktable remove any screws and hinges. Be sure to save anything that will be reused. 
  • Move the numbered tape to the exposed wood where the hinges were 

Step 3: Clean the surfaces

  • Use ordinary household cleaners to remove the grime from all of the surfaces you intend to paint. If ordinary cleaners don’t do the job, you can use trisodium phosphate, which is sold at hardware and paint stores. Make sure you follow all safety precautions.
  • Once all the surfaces are clean, rinse them with water and let them dry completely

Step 4: Prep boxes

  • Put on required safety gear. Open any windows in the room for ventilation. Dip the abrasive pad in deglosser and scrub down all the surfaces
  • Hold a rag underneath to catch any drippings. Use a separate rag dampened with deglosser to wipe away any residue.
  • If you’re relocating any of the hardware, fill the screw holes with a two-part wood or autobody filler
  • Fillers set in about 5 minutes so only make small batches. It also shrinks when it sets so be sure to overfill the holes
  • Remove any excess with a paint scraper or if it becomes too hard, sands it down smooth.
  • Sand with the grain on all surfaces using 100 grit sandpaper 
  • Vacuum all the dust when you’re done. Also, wipe down with a tack cloth to make sure there is no more dust

Step 5: Prime cabinet boxes

  • Use a blocking primer on any heavily stained cabinets. It dries quickly and seals any knots and other surface defects that could possibly bleed through 
  • Start brushing the primer at the top and across the grain, then tip-off. Pass the brush lightly over the wet finish in the direction of the grain then tip-off. Always do this in one pass 
  • Be sure to follow the underlying structure of the cabinet and door with the brush. Where a rail butts into a stile, paint the rail first, overlapping slightly onto the stile, then paint the stile before the overlap dries.

Step 6: Sand, Caulk, and Fill

  • When the primer is fully dry, use 220 grit sandpaper on the flat surfaces
  • Using a medium grit sanding sponge, sand all profiled surfaces. They should be glassy smooth when done. 
  • Squeeze a bead of latex caulk into any open seems. Caulk tip should be no thicker than the tip of a pencil. 
  • With a damp finger, smooth the caulk. Fill any small dents, scratches, or dings with vinyl spackle. Smooth with a flat with a putty knife
  • After about an hour when the spackle is dry, sand with 220 grit sandpaper. Then vacuum and wipe down with a tack cloth 
  • Touch up any spots where sandpaper might have burned through the primer with a spray can of fast-drying oil-based primer.

Step 7: Paint the cabinet boxes

  • If the new color is the same shade as the existing color, you might be able to get away with using just two or possibly one coat of paint.  Using a lighter finish over a dark coat would take three coats. Be sure to use a new brush with each coat. 
  • Starting from top to bottom, brush across the grain, then tip-off with the grain. 
  • Use a mini paint roller for the interior of the cabinet 
  • Sand the surface between each coat and make sure to remove any dust or debris. 

Step 8: Prep, prime, and paint the doors, drawers, and shelves

  • Be sure to use the worktable to reduce the risk of any drips, sags. or runs. 
  • For paneled doors, start with the area around the panel.
  • Next, do the main field panel, followed by the stiles and rails around the edges
  • Wipe up any paint that ends up on the dry parts to avoid lap marks
  • When you’re done painting, pick up the door by the screw and one hook and hang both hooks on a sturdy clothes hanger. 
  • Hang from a curtain rod or clothes rod until dry

Step 9: Put everything back in place

  • Make sure everything is dry before the next step
  • Match the numbered tape on each piece and remove the tape before installing. Install all the hinges and knobs. 
  • Replace the drawer pulls and install each drawer. 
  • You’re done!

New California Housing Laws

Over the years, California has created a labyrinth of regulations, fees, barriers for housing construction which has contributed to the housing shortage. Identifying these laws and regulations as one of the main drivers, the state legislature in recent years has passed laws to remove the restraints. Some of the laws deal with land use and how many units are allowed on each parcel, others are related to cities imposing fees and requirements that make increasing the number of units impossible. Here are a few of the new laws that can impact the decisions of landlords and homeowners who want to grow their businesses and increase the value of their investment properties.

SB 9

A large percentage of land in California is zoned for residential use is zoned for single-family homes, restricting construction to one home per lot. SB 9 changes that for most single-family lots throughout California. It allows for the construction of a duplex on each lot, or the lot can be split into two, allowing for the construction of up to two duplexes (4 units total). Each unit can be sold or rented individually. Accessory dwelling units are not allowed on lots with duplexes.

There are a few restrictions for single-family lots to qualify. In order for the lot to be split into two, it must be at least 2,400 square feet. Historical homes and historical districts are exempt from the law. Homes in areas deemed high-risk fire territory are exempt as well.

There are also some restrictions in regards to renting and building duplexes. The owner must sign an affidavit stating their intent to make the home their primary residence for three years. Short-term rentals are also not allowed. All units have a one-month minimum requirement for leases. This means using the property initially for an Airbnb rental isn’t an option. Owners or any business connected with an owner of a parcel that has been split into two cannot do the same to an adjacent lot.

SB 10

One of the barriers to constructing higher-density housing like small apartment complexes is the frivolous lawsuits that come with construction and zoning changes. SB 10 helps to expedite the process. It helps cities rezone lots for up to ten units in high-transit areas and urban infill. Keeping local groups from filing lawsuits that can be drawn out for over a decade can help to keep costs down making the construction of small apartment complexes more economically viable. Cities are required by state law to change zoning to meet housing construction requirements which mean more lots will be zoned for this kind of construction in the future.

AB 68

Accessory dwelling units or granny flats are now allowed on single-family lots throughout California. AB 68 allows for the construction of an ADU and/or junior ADU up to 500 square feet to be constructed on a single-family lot. The junior ADU must be built within the original framework of the house. Some cities implemented delays and fees effectively making the construction of ADUs impossible. AB 68 removes those barriers.

The bill reduces the maximum time for approval from 120 days to 60 days. It also eliminates barriers for construction like minimum lot size and floor area ratios which made construction effectively impossible. The requirement for 1:1 parking replacements if the garage is turned into an ADU is also eliminated. It includes a by-right approval for all ADUs and junior ADUs for a minimal process. Cities are now also prohibited from banning short-term rentals in ministerially approved ADUs. The state can also investigate and compel cities to follow new ADU laws.

SB 8

This bill extends the Housing Crisis Act of 2019 to 2030 (the original date was 2025). Under this legislation, housing can’t be demolished in order to downzone or reduce the number of units. A lot with more than one unit cannot be demolished in order to have one house built on it. “Protected” units that fall under rent control or affordable housing or housing occupied by low-income residents must be replaced. Furthermore, any residents living in these units must be provided assistance for relocation.

In order to speed the process up for constructing new housing, cities are required to implement a preliminary application process. This is meant to lock in all the requirements and fees beforehand to allow for certainty for applicants. Under the legislation, there is also a maximum of 5 hearings before approval. The project must be approved or denied by the 5th hearing.

A city is required to respond within 30 days of the submission of a housing project proposal to determine in writing if it meets all the standards. If it does not, they are required to provide a list of changes that need to be made in order for the project to be approved. In any subsequent review of the project, the city cannot require any new information that was not included on their list.

The time required for project approval after an environmental impact report is certified has been reduced from 120 days to 90 days. For projects seeking tax credits or other public funding (like affordable housing) time for approval is reduced to 60 days. The law also requires cities to approve all projects that comply with the general plan or zoning ordinances.
DIY: How To Paint The Interior Of Your Home

Routine maintenance on a rental property can get expensive. Especially if tenants aren’t staying in the property for more than a year. Having to pay painters to come in and touch up, or completely repaint a rental property whenever a tenant moves out can add up costs quickly. One option to reduce your costs is to take the time to paint the interior of your properties instead of paying professionals to do it for you. If done correctly, you can end up with professional results at a fraction of the cost. Here are some helpful tips so you can do it yourself.

Remove switch plates and outlet covers

Before removing the switch plates and outlet covers, make sure you turn off all the circuits so you don’t get shocked. Use a screwdriver to remove the plates and covers before painting. Soak them in warm water to clean them while painting. Cover the space where the plates were with blue painter’s tape so you don’t accidentally paint them.

Cover unmovable items and floor

Use plastic tarps or rosin paper to cover the floor and any other objects to protect them from paint dripping. 

Remove or mask trim

If possible, remove baseboards before painting. If you can’t, cover the top part of the baseboards with blue painter’s tape. Cover the edges of doors and window trim with painter’s tape as well. 

Patch the walls

Examine the walls for any holes, peeling, scratches, cracks, or gouges. Smooth over all of these to ensure a smoother and more professional finish. Use fine-grit sandpaper to smooth over any cracks. With a paint scraper, scrape off any peeling paint. Smooth over and feather edges of scraped paint with sandpaper. Sand and spackle large blemishes. 

Clean the walls

Any visible stains or blemishes will be visible after painting so make sure you clean the walls thoroughly prior to painting. You can wash the walls with tri-sodium phosphate. This is effective at removing oils and dirt. 

Fill a clean bucket with cool water and pour in the specific amount of TSP. Use proper protective gear like manufacturer-recommended gloves, protective eyewear, and long sleeves. Be sure to not get any on your skin or in your eyes. Read safety instructions beforehand and know what to do if any gets on your skin or in your eyes. Soak a sponge with the solution and scrub the walls. After walls are scrubbed clean, fill the bucket with clean water and wash the walls then let them dry before priming. 

Prime the walls

Primer can be used to help cover any stains on the walls. If the walls have been thoroughly cleaned, you can consider using self-priming paint. An oil-based primer is recommended for indoor walls. If stains couldn’t be removed before priming, use a specific primer to keep stains from seeping through to the paint. Continue to add layers of primer until the stains are no longer visible. 

Cut in the edges

This means painting the areas along the edges with a brush where rollers will not be able to reach. This will help you avoid getting paint on frames, trim, and baseboards. Use an angled brush or an edging tool when cutting in.  

Prepare roller with paint

Dip the roller into the paint but don’t keep it in too long. You want to avoid any paint dripping from the roller. Roll the roller back and forth in the paint until it is thoroughly coated and you can hear a sticky sound.

Use roller in a “W” shape

Start in the corner of the room and make a 3-foot downward angle pass and back up again making a W shape. Keep doing this until all the gaps are filled. It is important to move quickly before the edges have a chance to dry. 

Fill in and finish

Continue to this process while occasionally stepping back to look for any blank spots that need to be covered.  Look for any gaps at the edges of where you previously cut in along the edges and fill in with the roller with horizontal or vertical passes. 

SB 10 Heads To Governor’s Desk

SB 10, a housing bill that impacts how local governments can rezone land, has passed in both the state senate and the assembly. Now that it has been passed, it heads to Governor Newsom’s desk where it will be signed into law. Newsom may not sign it immediately because of the impending recall election and many of the candidates running for governor have stated they will veto SB 10 if they are elected into office. Whether or not the bill ends up law could depend on the results of the midterm election. 

What does SB 10 do?

SB 10 doesn’t mandate anything statewide and doesn’t force cities to change anything they are currently doing. What it does do is make it easier to rezone parcels of land in transit-rich and job-rich areas. Specifically, it allows local cities to upzone parcels of land up to 10 units. Sb 10 streamlines the process and ensures projects of up to 10 units won’t be mired in long-drawn-out lawsuits. This can help keep the costs of construction down by reducing legal fees as well as speeding the construction up. 

The bill still allows cities to make decisions about zoning and urban infill. Cities do however need to meet their quota for new housing construction which is required by the state. SB 10 will help to make sure those numbers can be met by allowing the city to upzone parcels of land without any long legal battles that can delay a project for a decade.

With laws allowing landlords to increase the number of units on their lots, it creates more to manage. Ziprent can help landlords manage and grow their business by making property management easier.

SB 9 Passes California State Assembly

SB 9 passed the California State Assembly on August 24th. The bill passed with 44 ayes and 16 noes and is now ordered to the State Senate for concurrence. If the bill is approved by the State Senate, it will then head to Governor Newsom’s desk to be signed into law. 

SB 9 review

SB 9 allows for owners of single family lots to build duplexes. Single family lots that are currently zoned for a single home would be zoned for up to a total of four units under SB 9. An owner could build a duplex or split the property into two lots and build a duplex on each lot. It wouldn’t have to be just duplexes either. A lot could be split into two and a single family house could be built on each lot. 

The bill wouldn’t change anything for those who live in a single family home and choose not to change anything. It does however change the zoning for every lot currently under single family zoning. This means local municipalities can no longer restrict new housing construction through strict zoning laws. 

Significant Amendments to SB 9

Since the inception of the bill, most of the concern has been about speculation and developers. In order to assuage those who had concerns about developers taking advantage of the new laws, some amendments to SB 9 were made. The bill explicitly states ADUs wouldn’t be allowed on properties where duplexes are built. It would limit the total number of units on a single family lot to four.

It also limits the ability for corporations or owners to build duplexes on adjacent lots they own. Owners will also be required to sign an affidavit stating their intent to make one of the new units their primary residence for at least three years. It is only a letter of intent which means if circumstances change and an owner needs to move, it won’t impact them. 

SB 9 Passes Committee in State Assembly

Over the past two years the California state legislature has been looking to pass bills that would help address the housing crisis. SB 9 just got one step closer on August 19th the bill passed in the appropriations committee in the State Assembly. There was only one no vote in the committee and the bill has seen strong support in both chambers throughout the process. 

What happens next?

Now that the bill has moved out of committee, it will move to the floor for a final vote. Since the bill has already been approved by the state senate, it will head to Governor Newsom’s desk to be signed into law if the Assembly passes the bill. 

What would that mean for landlords?

Current laws in most areas limit the ability for homeowners to add more units onto each lot. Single family zoning which makes up a large percentage of housing in the state means that only one unit is allowed on each lot. SB 9 would change that for some single family lots, depending on where they are located. This means that if one of your rental properties qualifies under SB 9, a landlord could potentially add more rental units on each lot. 

SB 9 would allow for owners to build a duplex on a single family lot. It would also allow owners to split a lot into two lots, building a second home, or a second duplex on each lot. There are limits to how many units can be on each lot and the law restricts owners from adding accessory dwelling units to each lot that has a duplex built on it. 

Limits for developers

While SB 9 makes it easier for property owners to add more units on their lot, there are restrictions that are targeted to limit developers from buying up too many lots in the same neighborhood. If two lots next to each other are owned by the same person or company, only one lot can be split into two or have duplexes built on the lot. 

While SB 9 limits the ability of local governments to stop landowners from building more units on their lots, there are restrictions for those who own homes in historic neighborhoods. Depending on the local governments, there could also be certain design restrictions that require new homes to meet a specific style. Other than that, there is little a local government would be able to do to stop a landlord from adding more rental units to each lot. 

More opportunity

While some landlords may have just one or two properties and aren’t concerned with growing their business, others who are more ambitious and plan on growing their business will see SB 9 as a great opportunity. The California housing crisis is decades in the making and has a deep hole to dig out of in order to create a large enough supply of housing to match the demand. With rents going up fast in the short term and expected increases in the long term, adding more units to each lot is a great way to increase income and potentially buy more property.

Required Living Standards For Rental Property

Maintaining a property is important to keep tenants happy and helps to keep occupancy rates high. It is also required by law for a basic living standard when it comes to certain functions of the property. It is important to remain on top of these repairs because not only will it keep your tenant happy, but it will ensure they aren’t legally allowed to withhold rent. 

If a landlord fails to keep a property up to the legal standards for health and safety, a tenant can withhold rent, pay for the repairs themselves and deduct it from the rent, call state or local building health inspectors, sue the landlord, or move out without notice. 

It is illegal for a landlord to retaliate against a tenant who exercises any of these rights. Keeping a well maintained property will help a landlord avoid any issues that could arise. 

Throughout the rental term, landlords are legally required to provide a livable home. Here are the elements of the home required to be functional in order to keep the property up to legal standards

  • Waterproofing and weather protection of roof and exterior walls. This includes windows and doors. 
  • Plumbing, heating and electrical facilities must be maintained. This includes hot and cold water as well as functioning kitchen sinks and toilets. 
  • Clean and sanitary building grounds. No trash or debris can be laying around. Landlords are also required to provide trash receptacles. 
  • Well-maintained floors, stairs, and railings. 
  • Deadbolt locks on specific doors and windows
  • No lead paint hazards
  • No nuisances. Anything that could be a danger to human life or detrimental to health can be allowed on the property. 

Best practice for requesting repairs

Both tenants and landlords should both want all maintenance requests in writing. This can help eliminate any confusion down the road and ensure landlords are able to keep track of unfinished tasks and complete them in an orderly fashion. One way to simplify this process is to have a portal online where tenants can submit any maintenance requests.

What To Look For In An Investment Property

There is currently a high demand for housing combined with a shortage of supply which is pushing up the price of homes in many regions. Homes aren’t on the market for very long and many buyers are putting in offers on homes without seeing them in person just so they don’t miss out on the property. Because prices are increasing, it is important to consider what is valuable in an investment property and no take on too much risk.

Here are a few things to consider when looking for an investment property:

Location

When it comes to purchasing an investment property, location is one of the most important things to consider. Areas with stable or a growing population and job market are likely going to be a good place to purchase an investment property. Also look at the local crime numbers and try to find a place with low crime. Public transit is another factor to consider. There are renters who don’t own cars or prefer public transit and if your property is near public transit, you’ll have more people competing to lease it. 

Avoid a fixer upper

Unless you have a lot of experience in fixing up investment properties, or you’re able to do most of the work yourself to keep costs down, try to find properties where only cosmetic repairs are necessary. Avoid properties that have issues with things like the foundation that might not be as big of an issue if it is a personal home you plan on living in long term. Look for a home that might need a few minor improvements like kitchen counters, flooring or improvements in the bathroom. 

Look for low cost homes

It might be enticing to try and find investment properties in neighborhoods that are already popular, but low cost homes in up and coming neighborhoods can get you a bigger return on your investment while also taking on less risk. As housing supply dwindles and rents increase, less popular neighborhoods become more appealing, especially for young professionals. Look for trends of where young professionals are moving within a city. 

The quality of schools

This may or may not be important depending on the actual property you’re purchasing. If it is a property with multiple bedrooms, the schools will be more important. If you’re looking at a one bedroom home, or a small apartment complex with a bunch of one bedroom units, the quality of the local schools might not be as important. On the other hand, if it is in a college town, a one bedroom home or apartments with one bedroom units can be a valuable property. 

Amenities 

Are there reasons why a large number of people would see value in renting in the neighborhood? Look to see what the local entertainment is. Are there a lot of parks nearby? Are there restaurants and bars? Are there bowling alleys and moving theaters? The more vibrant the community is, the more demand there will be for housing. 

Future development

Look to see what the city has planned for the neighborhood you’re considering purchasing a property in. Consider any big projects that might increase or decrease the value of the property. Many cities are looking to improve public transit and the safety of bike lanes and have those infrastructure projects in their long term plans. Those types of improvements can increase the value of your property. 

Average rents in the area

Look around at a few rental properties that are similar nearby. Find out what the average rents in the area are to make sure that you’ll at least be able to break even initially. Consider all the costs that go into owning and maintaining a rental property, and compare that to the average rents in the area. Also look into how fast rents are rising in the area to try and project what kind of return you’ll see long term. 

Natural disasters 

Some natural disasters are unavoidable when it comes to purchasing a home. There’s not much to consider in a state like California when it comes to earthquakes, unless you’re looking at a property that is on a faultline. One that is vital to consider, especially in California, is the risk of wildfires. The farther away the property is from large metropolitan areas, the more at risk it will be for wildfires.

AB 1401 Passes California Senate Housing

The California housing crisis is heating up as the pandemic comes to an end. People are returning to urban centers and rents are continuing to rise. On Thursday, in an effort to increase the supply of housing in the region, the Senate Housing Committee approved assembly bill 1401 to move forward to the next step. 

Now that AB 1401 is out of committee, it will move to the State Senate Appropriations Committee. If the Appropriations Committee approves the bill, it will then move to the Senate floor for a final vote. 

What will AB 1401 do?

If the State Senate passes the bill, it will then head to Governor Newsom’s desk where it will be signed into law. Once the bill is law, it will eliminate the minimum parking requirements for housing within a half of a mile or walking distance of  public transit. It will also stop local governments from requiring parking minimums for areas with a low VMT. VMT stands for vehicle miles traveled. What this means is, a densely populated area where people do a lot of walking and less driving will no longer be allowed to have parking minimums.  

How does this impact landlords?

If a landlord has a property in an area that is impacted by AB 1401, it would create more options when it comes to building more units on the property. For example, more of the lot could be used for housing units. A lot may be big enough for a 10 unit apartment complex, but parking minimums means that instead, only 4 units are possible. By being able to build more units on a lot, it allows for landlords to get a greater return on their investment. 

Not only does this create an opportunity to build more units on each lot, it also means new developments will be less expensive and require less maintenance. Less cement would need to be poured and maintained as that space could be better used as rental apartments. 

This would also allow for landlords to access the millions of  tenants  who don’t own cars and place them in their units. There’s an assumption that everyone has a car, but that is not the case. For example, 7.5 percent of the households in LA don’t own a car. 

Creating opportunity

AB 1401 gives landlords options. When it comes to growing a business,  a landlord wants to make the best decisions based on the market, the costs, and potential return on their investment. Right now, the law in many areas doesn’t give landlords and developers that option. AB 1401 could potentially change that depending on where the property is.